Showing posts with label toe-up. Show all posts

3.08.2011

Challenge Socks #5: Get Smart Socks

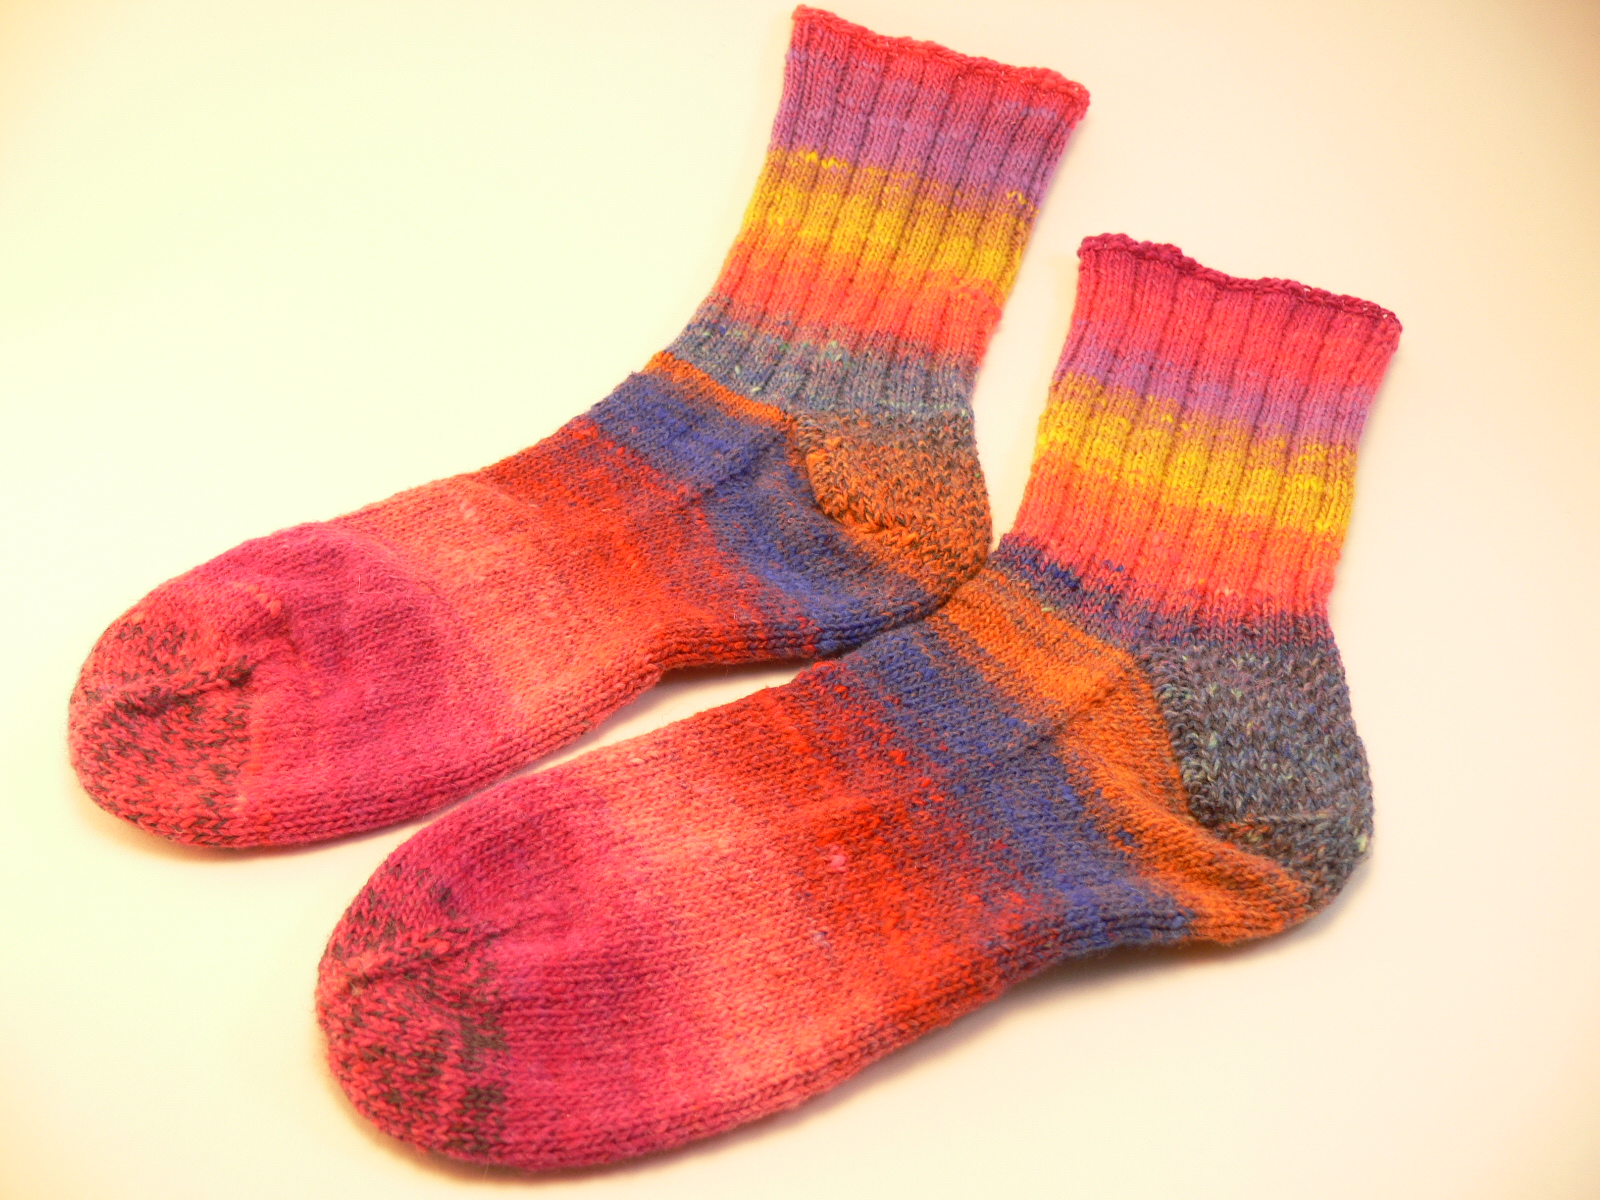
Every time I look at these socks, all I can think is, "Missed it by that much!" Maxwell Smart eat your heart out. I'm considering starting a gallery of Get Smart Socks -- or even branching out with an entire Get Smart line of projects that just don't quite hit the mark.

Behold:


That's right -- they don't match properly. I had the hardest time splitting this skein! Right around the half-way mark the colors were variations on pinks, purple-pinks, pink-purples, etc, and without a hard line delineating the color changes... well... I messed up. If they weren't so clearly capable of having been matched better, it wouldn't bother me so much. These, though, pretty much scream, "So close and yet so far away!"

I actually bought this yarn in late February 2007. I remember vividly because I made J stop at Acorn Street Shop on the way home from UW Medical Center, where I'd just had surgery for kidney stones. You know how sometimes you think you're doing just fine but you're really totally looped out and it's a good thing they made you bring someone else to drive you home? Well that was me that day! I'd never worked with Noro yarn before. Didn't even have any in my stash. So when I saw this skein of Noro Kureyon Sock on sale, I bought it -- despite the fact that it really didn't look or feel like anything I would enjoy knitting.

And I didn't enjoy knitting them. Not one single moment. The yarn is miserable to work with! It's rough and scratchy. I actually developed callouses on the parts of my fingers and hands that made contact! Moreover, my hands were strained and achey every time I worked on these socks. Every stitch required extra effort. Turning the needles took extra effort. They seemed interminable! I don't know how many times I called my sister to say, "I really hate this yarn."

I found the inconsistencies in grist irritating more than charming. See that bit pooking out weird just below the yellow?


It's an ugh in my book. Pooking is definitely the right word for what it's doing, too. (Sorry I didn't bother to color-correct that picture.)

The parts I liked?

I appreciated the way the colors transitioned. It was interesting to watch as I knit... even as I ground my teeth at the mis-match. I also liked the heels.


For some reason, I really enjoyed the stitch definition and the way the reinforcing thread worked in with the Noro.


I used my beloved Eye of Partridge stitch. This time I put 2 stitches of garter on either side of the heel flap.  It's a neat look.

I really like the fact that they're done, too!

It may be debatable whether my Get Smart Socks can rightfully be counted towards My So-Called Sock Challenge, though. I started them quite some time ago and had worked them up to the point where the gusset starts before I set them aside for a long hibernation. When I pulled the partially knit pair out of my sock yarn stash on February 24 and decided I'd soldier on and finish them rather than frogging them and giving away the yarn, I honestly thought they'd only been hibernating since winter 2010. However, if my notes are correct -- and I'd bet money they are -- I actually cast these on back in February 2009. Read that again: 2009 -- TWO years ago!!! I rarely leave WIPS to languish like that. I did mention that I really hated knitting these socks, right?!

February 24 I picked them back up again. I blasted through the gusset, debated working the faster short-row heel but stuck with my trusted one to ensure these miserable things at least fit, stacked a 3 x 1 rib on top, and knit until I found a stopping point that had a color on the bind-off edge that at least was close if not a match.

So half the socks were done a long time ago. But even though I hadn't frogged them, they basically moved back into my thinking as stash yarn rather than WIP. I'm not playing my sock challenge by any rules other than that I need to use stash yarn and I need to knit at least 12 pairs in a 12-month period, so I've decided to count them.


My So-Called Sock Challenge Tally (as of 2.28.11):
Total: 5 pairs in 3 months

The Details:

Pattern: Mash-Up Magic Toe-Up Socks (designed by me)
Started: February 2009
Completed: February 28, 2011
Materials: Noro Kureyon Sock yarn in a Mork's suspenders-style colorway
Needles: US 1-1/2 / 2.5 mm
Gauge: 8 st/in
Primary Stitch Count: 64

The big question now is whether I'll wear them. They haven't been on my feet yet. I'm told the Noro softens with wearing and that I'll probably end up loving them more than the rest. Wouldn't that be something?! I'm open to that possibility so will keep an open mind. I'm also curious to see how the yarn holds up to wearing since it's not plied. Time will tell!

1.11.2011

Short Row Heels Have A Place...

... and apparently that place is on any and all socks knit for my mother's feet.


Until this winter, I hadn't knit a short-row heel for at least 4 years. I understand the economies of time involved in short-row versus heel-flap socks. I just don't understand why anyone devoting their time to making hand-knit socks would want to put their creative efforts into a machine-style heel, especially when heel flaps have such luxurious extra cushion and the variations of beautiful stitches and stitch combinations in the heel-flap/gusset construction are so much more aesthetically pleasing.

My mother presented a convincing reason: short-row heels stay on her feet better. Post stroke, her right foot has been largely numb and doesn't function as it did before. The change to her foot is not only functional, it's also visible. It looks rounder and less toned -- almost in the same way as a baby or toddler's foot.

One of the things I prize most about hand-knit socks is their customized and, therefore, more comfortable fit. Given my mother's needs, I had no choice but to set aside my personal aesthetic and kinesthetic feelings about sock heels... and I did so happily.


Mom provided the yarn from her stash. Last year my sister and I had added up all the yarn Mom's collected in the last four years or so since she started knitting again, calculated it by the amount of time it takes her to complete a pair of socks, and determined that she could knit for 15 years solid before depleting her stash. Something had to be done!

So before her winter visit this year, I offered to knit up some socks for her from her stash yarn. I asked her to bring some from the lighter fingering weight options, figuring this would reduce her burden even greater because I would not only reduce stash stress but also take on a greater number of total gauge stitches per inch required by her stash choices. I'd rather leave her with yarn that works up more quickly with fewer stitches per inch rather than yarn that knits up at a gauge of 7.5 stitches/inch or greater. If she were working 9 stitches/inch, I think it would take her 18 months or more to complete a single pair!

We spent a good amount of time contemplating stitch patterns. She wanted a pretty, all-over pattern that hugs her foot and leg. It's also important to her that the socks keep her feet warmer and not be too airy. We ruled out lace or slip-stitch patterns. And based upon the yarn she had brought, I also ruled out cables. We settled on the lovely little twin rib stitch, which I placed on the leg and top of the foot.


The socks worked up quickly, and not only because she prefers a 7-inch leg height (as compared to my preference for a 9- or 10-inch leg height on my own socks). The twin rib is a very simple, 2-row, 6-stitch pattern that flows easily over the needles -- and the yarn flowed equally easily. I spent just a week on them, knitting only a couple hours each evening.


Ironically, my efforts made it possible for her to add another new sock yarn to her stash during her visit -- a gorgeous single-ply wool hand-dyed by Lollipop Cabin, a local dyer in Snohomish. How could I refuse her? She also added another skein to her stash for a pair of fingerless mitts like the ones I knit several years ago.

Not to be accused of moving her one step forward just to let her take two steps back, I've now taken on the project of knitting up the fingerless mitts for her before she leaves Thursday morning.

I've also spent the last week working to teach her how to knit short-row heels. She's determined to be able to do this herself rather than rely on me or my sister to work the heels. It took us 5 days to get her through the first heel -- and I'm pretty sure I unknit more stitches than she knit -- but she finally did it! And she's made good progress on the second heel all by herself, with no help from me other than to confirm that she's on the right track.

How wonderful for her! (And I can return to my personal heel-flap/gusset bliss.)

Project: Twin Rib Holiday 2011 Socks for Mom
Pattern: Mash-Up Magic Toe-Up Socks (pattern by me). Freely available here on Aesthetic Entanglementz (in pictorial or conventional pattern forms) or on Ravelry.
Primary Stitch Count 64. Modified for short-row heel.
Started: December 26, 2010
Completed: January 1, 2011
Materials: Regia Bamboo Color, 2 skeins, colorway 1065 (pink variegated)
Needles: US 2 - 2.75 mm


3.20.2010

Island Knitting


My family went to Orcas Island in the San Juans the first week of January. I love the island at this time of year. We took my mother with us to the little two-room cabin on the waterfront that has become our favorite home away from home. The last night of our stay, the setting sun reflected gorgeously on the underside of the clouds. It was truly stunning.

I knit a pair of socks on the trip.


Pattern: Mash-Up Magic Toe-Up Socks (MUMTUS) - recipe compiled by me
Materials: Cherry Tree Hill's Supersock DK, Colorway: Country Garden, 1 skein
Needles: US 3 / 3.25 mm
Gauge: 6.5 st/in
Primary Stitch Count: 52


It's a straightforward sock: stockinette on foot and gusset, eye of partridge on the heel, standard 2x2 rib on the cuff. I finished them within the week of our trip.

This is the first time I've done a DK weight sock for myself. They're mushier and thicker than my usual preference. CTH promises that they wear like iron, and I'm putting it to the test given my preference for wearing boots every day. I have to say, the stretchiness of the fabric, even though I used a smaller needle size than recommended, causes me pause. Every time I put them on and slip them into my boots, I think, "Today's the day my toe will go through the end!" So far so good, though. No holes. I did reinforce the toes with my standby Russian laceweight wool, and it's only been about two months. Still, they're getting heavy wear in steady rotation...

I started another pair of socks on the island, too. This with Noro's Kureyon sock yarn. I'll blog on those later, but suffice it to say for now that I have not enjoyed one, single stitch on these socks, evidenced by the fact that they've been on the needles for two months and I've yet to get halfway through the gusset. If anyone out there has insight into the appeal this yarn holds for people, please share!

7.31.2008

Took Long Enough

After making two other pairs of socks that don't count, I present (finally) my first entry for Summer of Socks 2008: Prizewinning Asparagus of Pacific Beach.


Pattern:
Asparagus Cables Socks by Wendy Johnson (size: large)
Materials: The Knittery's 4ply Sock: Merino Cashmere, 1 skein (397 yds), Seabreeze
Needles: US 1 / 2.25 mm
Started: June 21, 2008
Completed: July 23, 2008

This is the pattern and yarn Wendy sent me as reward for winning the 2008 Summer of Socks button design contest, so I thought it fitting that these be my first socks for this year's along. I cast on the day Summer of Socks opened. I did the bulk of the knitting on our camping trip at Pacific Beach—inside our tent because it had to be the coldest, windiest summer camping adventure ever!

The pattern calls for a US0 needle, but I used US1 for better gauge and to produce a fabric that wasn’t stiff. Even with the increased needle size, my gauge was still more like 9 st/in rather than the 8 st/in called for and the fabric is very dense. My gorgeous summer-colored socks will be brightening up the Seattle gray winters! (That's appropriate, I suppose, given the wintery temperatures of our time at Pacific Beach.)

I knit both socks at once on Magic Loop. The stitch pattern itself is not difficult. But if you’re going for a full-length sock, all the twist stitches can get tedious. I had to use a cable needle rather than employing a needle-free cable technique—my stitching was too dense and the yarn too split-y to make it work otherwise. It actually took me longer to do the twists when I tried the needle-free method!

Tedious, perhaps, but the twist stitches are exquisite!

That ribbing's just shy of one inch long. Would have preferred 2 inches, but I ran out of yarn. Rats—it's a good thing these socks are knit toe-up! I might not have run out if I'd made the medium size instead of large, which I'll do when I make this pattern again. At the very least, I'll cast on fewer stitches for the toe, which is much wider than I can wear well and puckers quite a bit. I’m hoping to even this out with blocking.

Modifications: The pattern is written for the two sides of the twist motif to be split, with 4 extra stitches added around the width of the sock, and with the split cables extending into the ribbing. I did not split the side cables at the top of the heel, did not add the 4 stitches, and did not extend the side cables into the ribbing.


With the cashmere content, this yarn is too soft to really show off all the neat little twists. In person—without the benefit of the lighting for the pictures—the pattern gets a little lost in the halo. Next time, I'll select a yarn with higher twist and more subtle color variations, if any. Despite how it shows in the photographs—where I’ve worked to emphasize texture—the colorway stripe is just pronounced enough to distract from the pattern.

All that said, these are tremendously soft and thick socks, and I’m sure they’ll be on my feet a lot come the cold season!

I'm so grateful to Wendy for sending such a luxury of yarn to work with, in addition to her pattern. I've not seen this yarn at any of my regular LYSs, and it's been such a joy to have my hands on while I knit!

7.29.2008

Workshop: MUMTU Socks Pt11:
Charts for Custom Fit

  1. Intro, Items Needed, Stitches Used
These charts are from Judy Gibson’s "Putting Me On Socks,” which she acknowledges as originally contributed by Peggy Pignato. Chart 2 appears as originally published. Chart 1 has been modified from the original, but the calculations follow Pignato’s original proportions.


IMPORTANT! For Chart 2, you need to subtract this number from the total length of your foot in order to get Measurement #3. (Example for a 9" foot circumference: 9 - 4 = 5. Therefore, I cast on at the toe and knit for 5 inches before beginning the gusset.) This length does vary by the person, though. So if the socks are for you, try them on to make sure they're long enough before starting your gusset. And if they're not for you and you have the possibility of taking an accurate Measurement #3 from the intended's foot, do so and use that measurement instead!

Workshop: MUMTU Socks Pt10:
Leg & Cuff, Bind Off

  1. Intro, Items Needed, Stitches Used

STEP 11: Leg & Cuff

Once you arrive at the leg, the possibilities are almost limitless. Here are a few options:

  • Continue in stockinette stitch until the socks measure 1-2 inches shorter than the desired length from bottom of foot to top of sock. Then switch to K2 P2 ribbing for the final 1-2 inches of cuff (according to your preference). I used this option, ankle-length, for C's Sleeping Socks:


  • Knit a few rounds of stockinette to establish the leg and then switch to a ribbing pattern of your choice all the way up the leg. I went with a 2x2 rib up the leg of my Anti-Pro Natura Socks:


  • Knit a few rounds of stockinette and then switch to a special design pattern all the way up the leg. (If you think you might take this option, you will need to have swatched in the special pattern. You may find it necessary to switch needle sizes to make sure your gauge in the special stitch matches the stockinette gauge used on the foot.)
  • If you started incorporating a special design stitch on the instep/top of foot, simply continue that design up the leg.

STEP 12: Bind Off

There are many ways to bind off. For toe-up socks, I recommend Elizabeth Zimmermann's Sewn Cast off (from Knitting Without Tears), which provides all the elasticity you will want for the top of your sock and can be used on any stitch edge.

Draw out your working yarn to a length of about 4 times the circumference of the sock. Break it off and thread it onto a tapestry needle. Execute the sewn bind-off as follows:

  1. Sew forward (right to left, as if to purl) through two stitches.

    Do not remove these stitches.

  2. Now sew backward (left to right, as if to knit) through the right-most stitch...


    ... and remove this stitch.

Repeat these two steps until you run out of stitches.

Once you have bound off the last stitch, make a simple daisy chain from the last bound-off stitch through the first bound-off stitch and back through the last bound-off stitch to create a seamless edge.

Weave in the tail on the inside of the sock and trim any excess.

You’re done!

Put on your new socks. Dance around the house.

Take pictures.

Celebrate that you won’t be suffering from the dreaded SSS (Second Sock Syndrome)!

As always, feel free to email me if you have questions. I love reading your comments, so please post your feedback. And I'd be thrilled to see pictures of socks you make using this pattern!


7.28.2008

Workshop: MUMTU Socks Pt7:
Foot, Gusset

  1. Intro, Items Needed, Stitches Used


STEP 7: Foot


Knit all rounds, trying the sock on from time to time, until the sock reaches the point on your foot where the leg meets the top of the foot. (Or until the sock measures the length determined by Measurement 3 or Chart 2.)


If you want a decorative stitch pattern on the top of the foot, knit 3 rounds and then start the new stitch pattern. Knit the decorative pattern across the stitches on Needle 2 only. And remember that you must swatch for gauge in your chosen stitch pattern to calculate your primary stitch count.

STEP 8: Gusset

Round 1:

  • Needle 1 (bottom of foot/sole): K1, M1L, K to 1 stitch from end, M1R, K1
  • Needle 2 (top of foot/instep): Knit all.
Round 2: Knit all.

Repeat these two rounds _____ times (Chart 1, Row C) altogether until…
There are more stitches on Needle 1 than Needle 2 now.


Workshop: MUMTU Socks Pt6:
Toes

  1. Intro, Items Needed, Stitches Used


STEP 6: Toes


If you are already familiar with how to do toe increases when knitting socks from the toe up, here is the basic instruction for this pattern:

  • Round 1: Needle 1: *K2, M1L, Knit to 2 stitches before end of sock, M1R, K2.*
    Repeat for Needle 2.
  • Round 2: Knit all.
  • Repeat these two rounds until the total number of stitches for each sock equals your Primary Stitch Count. (Half on each needle.) Cut the reinforcing thread.
If you have never knit toe increases on socks being worked from the toe up, here is a more detailed breakdown:

Round 1:
  • Starting from Neutral Position, pick up working yarn for Sock 1
  • Knit 2 stitches
  • M1L as follows:

    See the bar between the 2nd and 3rd stitches (photo below)?

    You need to mount it on your left needle, with the tip of the needle entering the loop from the front and coming out the back.

    I find this easiest if I use my right needle to help me, like this:


    When you've picked up the bar properly, it will look like this:

    Knit the bar through the back loop:

  • Knit until 2 stitches before the end of the sock.

    That's the bar, ready for your M1R!

  • M1R by picking up the bar and mounting it on your left needle so the tip of the needle enters the loop from the back and exits through the front.


    Knit the bar through the front loop.

    It can be a little tricky to insert the needle for this knit stitch. It helps me to insert the right needle as if to purl, first, and to tease the picked-up bar out away from the needle a bit... then hold the stitch out while I move the right needle to insert it for the knit. (Sorry I didn't take a picture of this.)

  • Knit 2 (This completes the first half of the round for Sock 1.)

  • Drop working yarn for Sock 1 and pick up working yarn for Sock 2. Repeat the same stitch sequence—Repeat the same sequence—*K2, M1L, Knit to 2 stitches before end of sock, M1R, K2.* (This completes the first half of the round for Sock 2.)


  • Turn your work to Neutral Position...


    ...and adjust the needles for knitting the next half of the round.


  • Repeat the increase sequence—*K2, M1L, Knit to 2 stitches before end of sock, M1R, K2.*—for each sock, being sure to change working yarn when you move between socks. (This completes your first increase round.)
Round 2: Knit all for the entire round. (Don’t forget to change working yarn as you move between socks.) Remember, knitting an entire round means knitting around both needles: knitting the first half of Sock 1, the first half of Sock 2, turning the work, knitting the second half of Sock 2 and then the second half of Sock 1.

Repeat these two rounds until the total number of stitches for each sock equals your Primary Stitch Count. Half are on each needle. (So if your primary stitch count is 64, then 32 stitches will be on Needle 1 and 32 on Needle 2 for each sock.)


Cut the reinforcing thread once you reach your primary stitch count.

Now is a good time to snug up the loose cast-on edge at the tail, if you haven't already.


Now is also a good time to tuck in that pesky tail!


7.27.2008

Workshop: MUMTU Socks Pt2:
Gauge, Measurements, Primary Stitch Count

  1. Intro, Items Needed, Stitches Used
  2. Gauge, Measurements, Primary Stitch Count (You are here!)


GAUGE, MEASUREMENTS, AND PRIMARY STITCH COUNT


For the purposes of this pictorial, I'm using Rowan Designer DK Wool on US 5 / 3.75 mm (40" KnitPicks Options Interchangeables) needles to make a pair of sleeping socks for my 8-year-old daughter.


STEP 1: Gauge

To assure your socks will fit, you must make a gauge swatch to determine your stitches per inch. Select a needle size that produces a tight (but not hard) fabric in your chosen yarn. You may need to swatch more than once to get fabric density you prefer.

I have found that the needle recommended on the ball band is usually too big for my taste. In general, if the ball band says to use a US2-4 needle, I use US1.

A higher-density fabric means a more snug fit and longer wear for your socks!


Be sure to swatch in the stitch or color pattern (especially if working fair isle) you will be using in your project. And for magic loop socks, you will want to knit your swatch using magic loop technique. Yes, this means you will be making a larger swatch than you might otherwise wish to do, but it will be worth it! If you just aren’t built for heavy swatching, make a magic-loop swatch at least 2” x 2” in size, like this:


If you've never made a gauge swatch before, it's simple. After knitting the swatch, grab a ruler—any kind of ruler will do—and count the number of stitches per inch.

In this swatch, I'm getting 6 stitches per inch... perfect for a sleeping sock. Given how tight I knit, it's normal for me to have a gauge of 9 stitches/inch using fingering weight yarn.

For this pattern, we don't need to worry about row gauge.

Make note of your stitch gauge here in the STEP 3 chart below.

STEP 2: Measurements

For ankle or calf socks, take these measurements, which are key to making socks that fit, and write them down:

Measurements
  1. _____ width around ball of foot (widest part of foot)
  2. _____ length of foot from toe to back of heel
  3. _____ OPTIONAL: length of foot from tip of toe to the point on the sole corresponding with the line where the leg meets the top of the foot. See picture below. This measurement is only important to take if the socks are for someone other than yourself. When knitting for yourself, you can just try them on to check length! If you are making socks for someone else and don’t have this measurement, it's ok. See Chart 2 for standard measurements.
  4. _____ OPTIONAL: desired height of sock from floor to top of cuff. If you’re uncertain, a good rule of thumb is to make the sock height equal to the length of the foot.

For Measurement #3 (above)

STEP 3: Calculating Primary Stitch Count

The foot and leg of your sock will have the same number of stitches and comprise the majority of your knitting. Therefore, we refer to this number of stitches as your primary stitch count.

To calculate primary stitch count:
________ your gauge (#stitches per inch)
x ________ width around ball of foot
= ________ Subtotal 1
- ________ 10% of Subtotal 1
= ________ Subtotal 2

* ________ Adjust Subtotal 2 to nearest multiple of 4

* This is your Primary Stitch Count!

6.29.2008

Mash-Up Magic Toe-Up Socks (Recipe)

My first socks of summer are done, blocked, and photographed!

Too bad they don't count towards my Summer of Socks 2008 participation! I do have two other legitimate SoS08 pairs on the needles right now. Sadly, I cast the ones pictured on on Father's Day, as I needed an in-process demonstration sock for the magic loop class I taught.

I've dubbed them the Mash-Up Magic Toe-Up Socks (MUMTU Socks or MUMTUS), and I've posted the condensed version of the pattern on Ravelry. Ravelers can view the project page here. Anyone can download the PDF by clicking here.

(ETA) You can also work through the pattern using my in-depth workshop/pictorial here on Aesthetic Entanglementz.

If you're not on Ravelry, don't despair—I haven't forgotten you! I've just run out of time to complete the conversions needed to post the pattern here before I leave for my camping trip in the morning. I am working on the pictorial for a workshop version of the pattern that will debut on Aesthetic Entanglementz shortly after I return from vacation later this week. (Another pair of socks that won't count towards my Summer of Socks participation since I'll be making them kid-sized. Alas—C just couldn't handle seeing another pair that wasn't for her!)

Aside from the fact that this pattern's customizable for any size, yarn weight, or gauge, what makes it special is that it features a pretty gusset and heel-flap (rather than a short-row heel) worked in the toe-up, magic loop construction.

My favorite! If I never saw another sock design, I could happily make these forever!

Here are my notes on the socks as pictured:

Pattern: Mash-Up Magic Toe-Up Socks (Recipe compiled by me). Download PDF.
Materials: Zitron Trekking Pro Natura, 1 skein, colorway 1602
Needles: US 1 / 2.25 mm
Started: June 15, 2008
Completed: June 27, 2008

Specs as pictured:

  • Magic Loop
  • Toe-Up
  • 2 at once
  • 2x2 ribbing on leg
  • Gusset
  • Eye of Partridge Heel Flap
  • Reinforced toes (using laceweight Russian wool from my stash)
  • Primary Stitch Count: 72

Love the pattern. Love the fit. Even might be persuaded to say I love the feel of the yarn. But I strongly dislike the look of the yarn. So much so that I lovingly refer to this pair as my "Anti Pro Natura Socks."

I really wish Zitron—and other yarn manufacturers, in general—would state on the ball band whether there’s a clear repeat within the yarn or not. They don't really have to include a picture of what exactly the pattern looks like, but some indication would be nice! You know, like: Repeating pattern, 3 yards. Aside from being courteous, it would make for happier customers, I think. In the case of the Pro Natura, I couldn’t discern a clear repeat when I was dividing the skein and winding the balls. However, about 4 inches into the socks, it became readily apparent that there is, in fact, a repeat … and that I hadn’t gotten the socks aligned. (In fact, I was only off by a slight margin, but that was nothing more than luck.) Grrrr.

Besides the repeat issue, I really just dislike how the colorway worked up. It's too bad because I thought the yarn was absolutely gorgeous in the skein. I liked it so much that I almost bought 2 skeins! But when I look at it worked up, I think it's bleghchy. I’m just not a fan of the areas of white pooling or of the way the contrast works. This is the kind of colorway and striping that makes me cranky, in general, because it rarely looks good knit up and just indicates to me that the yarn manufacturer wasn’t working with enough sensitivity to finish project.

So I ended up hating these socks the entire time I worked on them–not because of the pattern or concerns over fit or amount of yarn but, simply, because I don’t like the way the yarn looks. Some have asked why I continued knitting them if I dislike them so much—and why, on earth, I would have knit the cuff so long? Well, there's the obvious fact that these were being knit as a demonstration sock for the class. In addition to that, I decided they'll be good for wearing under boots (I'm wear boots almost every day during the cold months). That means nobody’s going to be looking at them. It also means they need to be long enough to peek over the boot top so the edge doesn't chafe my leg. Purely practical.

4.02.2008

Toe-Up Adaptation of Monkey Lace


It never fails that I figure something out just after I could have used it! I would have loved to do my Amphibious Monkeys toe-up, but I wasn't able to figure out a toe-up version of the lace quickly enough to satisfy my itchy cast-on fingers, and I couldn't find anyone else who'd already done it. Of course, the minute I pulled them off the needles, I had a brainstorm. A couple hours, three versions, and several swatches later, I had it. I am pleased to share with you now the lace pattern for Cookie A.’s Monkey Socks (Knitty.com, Winter 2006), re-engineered to be worked toe-up.

I take no credit for the original lace pattern, only this adaptation. I've tested three times to see how it worked with a variety of yarns. I've used Koigu PPPM (brown/orange) Zitron Trekking Pro Natura (grey/green/tan), and a cotton yarn which has lost its label (blue) — each of which is pictured in this post.

My version of the Monkey lace is unique because it allows you to work the Monkey socks fully in reverse, from the toe up, without inverting the finished appearance of the pattern. This adaptation also retains the purl stitches of Cookie’s original.


You will find my chart at the bottom of this post. To work the socks, use Cookie's pattern in tandem with my chart. My write-up assumes you already know how to convert a top-down pattern to toe-up. If not, the best way I would recommend for doing the Monkeys is to use Jennifer O’Sullivan’s ¡Los Monos Locos! – The Crazy Monkeys!, which is a very fine modification for knitting the Monkeys from the toe-up, two-at-once, on magic loop. She also replaces Cookie’s heel stitch with Eye of Partridge, which we know I prefer. The reason I didn't just use her pattern in the first place, though, is because her lace treatment reverses the original and eliminates the purls. If you use O'Sullivan's pattern, you can easily just swap out her lace chart for mine.


To re-engineer the lace for toe-up knitting, I had to plot different stitches in different sequences from the original. Intellectually, you may think that goes without saying. Emotionally, though, we all want to forget this and believe the finished fabric will look and behave just like Cookie's top-down design. That's not a realistic expectation. My version is close — really close — but it can't be an exact replica.

This pattern will work best for people who like their Monkeys a little chunky, who admire the bumpy texture and will not be blocking it out to emphasize the lace holes. The picture below highlights the area of the pattern that will not look right if you stretch the sock out: the ssk/yo sequence.


It retains the same textural effect as Cookie’s original when not overly stretched. But the ssk tends to ease towards the space created by the yo, so if you stretch the lace pattern, the ssk sequence will appear to have a little space on the right side in addition to the left, where it belongs. Since I prefer extra ease in these socks, that’s not a problem for me.

Do check gauge carefully. You still want to meet Cookie's specs. I knit the swatch too loosely for the Pro Natura, even on US 2s. Obviously, I'll be frogging the swatch. I'd do this even without the gauge issue, though, because I don't really like how the Pro Natura was working up for this pattern. Too bad. I thought for sure it'd be great on the Monkeys.

Here's an early swatch I made with a heavier yarn and just one repeat of the pattern wide. The version on the left is too different from Cookie's (although it's pretty). The version on the right is the same as I've written into my chart.


See how much neater the lace looks with this yarn and in this gauge?

And for comparison's sake, here's the Koigu version up against my Amphibious Monkeys — which also were worked in Koigu, but using the original top-down pattern.

The green ones have already been blocked while the brown, obviously, have not. Even so, I think it looks pretty darn similar. This picture does a good job showing the difference between the two as far as the holes go.

My chart is a work-in-progress. I continue to experiment with it and will revise it (and this post) as I make other discoveries.


Toe-Up Monkey Lace CHART
Download PDF Here.

Please leave comments or suggestions. I welcome feedback!