
Zhenya here for a brief intro: When my sister told me she was thinking about knitting with roving, I dove into our Olympic Fiber Arts inventory and emerged with the perfect fiber and an assignment: write a guest blog for Aesthetic Entanglementz! I write about my sister often enough that it’s high time you got a chance to meet her, too. So without further adieu, I give you...

Knitting with Roving, Part 1 ~ A Guest Blog Tutorial
by Elizabeth
Like so many fiber enthusiasts, I always have a list of projects I’m dying to start even -- I must confess -- when feeling overwhelmed by my myriad projects already in-the-works. The fact that my crafting interests are so varied only complicates things. I have multiple projects at different stages of completion for each hobby: sewing, knitting, cross-stitch, spinning, and weaving -- just to name a few.
My current favorite? Fiber, of course! I especially love hand-dyeing wool. My favorite part is when I first place the fiber in water to presoak. The lanolin smell of the wet wool is so clean and earthy! Not that I’m yearning to huddle with a flock of sheep in a downpour, but then again I’ve never had the opportunity. If I ever do get the chance (or have the misfortune), I’ll be sure to guest blog it for Aesthetic Entanglementz.
Enough of me and back to fiber; in particular, roving. I realize not everyone cares to try spinning -- in truth, it’s not been that many years since Zhenya scoffed at the idea when I first gave it a whirl. But surely even non-spinning fiber lovers must, when standing before a fluffly fleece or a lusciously hand-dyed batt, sliver, or roving, pause to wonder, “What could I do with this?”
For some the answer is needle felting. Zhenya and her family have experimented with that, and maybe she’ll blog about it someday. I understand that her mother-in-law made an amazing sheep! In my opinion, though, if you’re not going to spin with fiber -- or cuddle it -- the next best thing is to knit with it. Even so, my own desire to spin fiber is always greater than my inclination to knit it. I did say "next best thing," right?!
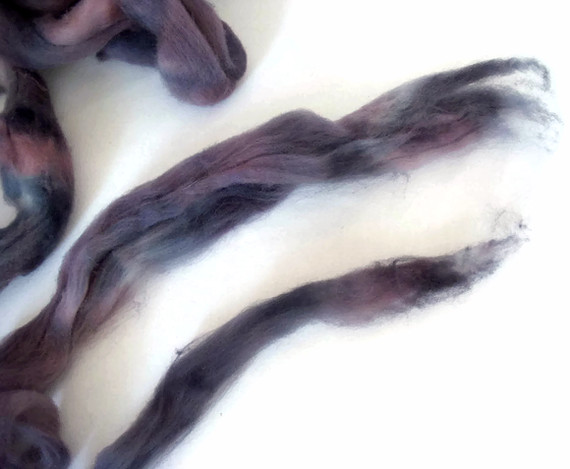
Look at the roving Z selected for me: Olympic Fiber Arts' Sunset on the Sound.

It’s so pretty, with its muted tones of pinks, greys, and smoky plums. It’s almost a neutral. I can only imagine how beautifully the colors would have blended together once spun. Alas, my assignment was to knit it. Zhenya thought this would make great knitting roving because the muted tones would remain more distinct if knit than if spun and because the colors already harmonize (which is a glorious product of the spinning in more clashingly colored rovings). Plus, it's a durable superwash wool that's next-to-the-skin soft.

If you’ve never knit with roving before, the idea of it is kind of scary -- a bit like the first time you cut into the steek on a cardigan you spent two years knitting. Set aside all those images of fiber just pulling apart like wisps in your hands; you needn’t worry.
Here’s how it works:
Start by unbraiding the roving.

Zhenya puts up the OFA roving using crochet-like chains, which makes them really easy to “un-zip” (carefully) from the bottom!
Next, separate the roving lengthwise (yes, that means the long, skinny-wise) into 4 or 5 thinner strips, each approximately the diameter of a No. 2 pencil. The roving pulls apart very easily.
This thinner roving is aptly named pencil roving because, ideally... well, you get it.
Now, if you’re an extreme perfectionist (like me), you might find yourself getting frustrated that you can’t get each length to be exactly the same diameter. Indulge your perfectionism for no more than a few seconds; then accept that, as usual, you’re over-thinking it. It will be fine if it’s close.
This is the pencil roving I made. It’s been separated, but nothing else has been done to it yet:

Once you’ve separated the roving into four or five thinner strips that are as close to the same diameter as possible, draft them a tiny bit to even everything out.
Drafting, which simply lengthens and straightens the individual fibers so they all lay nicely together in the same direction, is easy. Hold the fiber gently with your hands a few inches apart; slowly and carefully pull your hands ever so slightly further apart and watch as the fiber straightens itself out. Be careful: If you hold your hands too far apart, or pull too hard or too fast, you will separate the roving completely. When your plan is to spin the roving, that’s no big deal; but if your plan is to knit it, you really want to avoid this!
So how do you know how far apart to put your hands and how far is too far to pull? Staple length. Yes, it’s jargon, but this, too, is a cinch to figure out. Before you start drafting the roving, pinch a tiny tuft at the end and pull it away from the rest. You’ll notice that it came off in little strands of about the same length. That’s your magic distance! We'll call it "MD." It translates in practice like this:
Place your hands farther apart than MD (so the fiber will slip easily) but don’t pull the fiber as far apart as MD or the roving will separate.
Here you see my pencil roving has been drafted:

Here you see the difference between my pencil roving in its pre-drafted state (bottom) and as drafted (top):

How much should you predraft? That’s your call. I choose to err on the side of caution and leave the fiber thicker. It’s always possible to draft a bit more as you’re knitting, if necessary -- but it’s not possible to un-separate the fiber if you pulled it apart completely.
Once you’ve drafted all your fiber, you may want to check grist. It’s not necessary since you’ll swatch for gauge anyways, but if you’re curious (or, as some of us have already confessed, a compulsive perfectionist), it’s not such a bad thing to do. You’re aiming for the pencil roving to be about the same gauge as a bulky (12 ply) yarn -- about 5 or 6 wraps per inch.

I wrap roving tighter than I normally would with yarn because the fiber is so squishy and pulls just a hair thinner as I knit with it.
While you’re drafting (or knitting), you may come across slubs. Slubs are little bits where the fiber hasn’t fully aligned. They feel like bumps in the fiber. Here's one:

Slubs are not a big issue. I take care of them like this:

Slubs are not a big issue. I take care of them like this:

I pinch them out!
Once you've pre-drafted the fiber strips, gather them together for safe-keeping. I wind them into balls like this:

If you opt to do the same, please, please, please do not make the balls center-pull! Just imagine the disaster that would cause!
That’s all there is to prepping your fiber for knitting. And, really, that is the hardest part of knitting with roving.
Stay tuned for my next guest-blog entry, when I walk through steps for prepping your pattern and knitting a simple hat with all that lovely, pre-drafted roving!
If you’re dying to try this but don’t have any roving in your stash, why not give our hand-dyed Olympic Fiber Arts roving a try?


2 comments:
I love this post! I raise alpacas (www.laurelhighlandsalpacas.com) and was interested in knitting with the roving! Is part 2 coming soon? I'd love to see the hat.
I loved this post! Is part 2 coming soon? I raise alpacas (www.laurelhighlandsalpacas..com) and am always interested in things to do with the fiber! I'd love to see the finished hat. Your roving is beautiful!
Post a Comment