Showing posts with label magic-loop. Show all posts

5.31.2011

Knitting with Roving, Part 1 ~ A Guest Blog Tutorial by Elizabeth


Zhenya here for a brief intro: When my sister told me she was thinking about knitting with roving, I dove into our Olympic Fiber Arts inventory and emerged with the perfect fiber and an assignment: write a guest blog for Aesthetic Entanglementz! I write about my sister often enough that it’s high time you got a chance to meet her, too. So without further adieu, I give you...


Knitting with Roving, Part 1 ~ A Guest Blog Tutorial

Like so many fiber enthusiasts, I always have a list of projects I’m dying to start even -- I must confess -- when feeling overwhelmed by my myriad projects already in-the-works. The fact that my crafting interests are so varied only complicates things. I have multiple projects at different stages of completion for each hobby: sewing, knitting, cross-stitch, spinning, and weaving -- just to name a few.

My current favorite? Fiber, of course! I especially love hand-dyeing wool. My favorite part is when I first place the fiber in water to presoak. The lanolin smell of the wet wool is so clean and earthy! Not that I’m yearning to huddle with a flock of sheep in a downpour, but then again I’ve never had the opportunity. If I ever do get the chance (or have the misfortune), I’ll be sure to guest blog it for Aesthetic Entanglementz.

Enough of me and back to fiber; in particular, roving. I realize not everyone cares to try spinning -- in truth, it’s not been that many years since Zhenya scoffed at the idea when I first gave it a whirl. But surely even non-spinning fiber lovers must, when standing before a fluffly fleece or a lusciously hand-dyed batt, sliver, or roving, pause to wonder, “What could I do with this?”

For some the answer is needle felting. Zhenya and her family have experimented with that, and maybe she’ll blog about it someday. I understand that her mother-in-law made an amazing sheep! In my opinion, though, if you’re not going to spin with fiber -- or cuddle it -- the next best thing is to knit with it. Even so, my own desire to spin fiber is always greater than my inclination to knit it. I did say "next best thing," right?!

Look at the roving Z selected for me: Olympic Fiber Arts' Sunset on the Sound.


It’s so pretty, with its muted tones of pinks, greys, and smoky plums. It’s almost a neutral. I can only imagine how beautifully the colors would have blended together once spun. Alas, my assignment was to knit it. Zhenya thought this would make great knitting roving because the muted tones would remain more distinct if knit than if spun and because the colors already harmonize (which is a glorious product of the spinning in more clashingly colored rovings). Plus, it's a durable superwash wool that's next-to-the-skin soft.


If you’ve never knit with roving before, the idea of it is kind of scary -- a bit like the first time you cut into the steek on a cardigan you spent two years knitting. Set aside all those images of fiber just pulling apart like wisps in your hands; you needn’t worry.

Here’s how it works:

Start by unbraiding the roving.


Zhenya puts up the OFA roving using crochet-like chains, which makes them really easy to “un-zip” (carefully) from the bottom!

Next, separate the roving lengthwise (yes, that means the long, skinny-wise) into 4 or 5 thinner strips, each approximately the diameter of a No. 2 pencil. The roving pulls apart very easily.
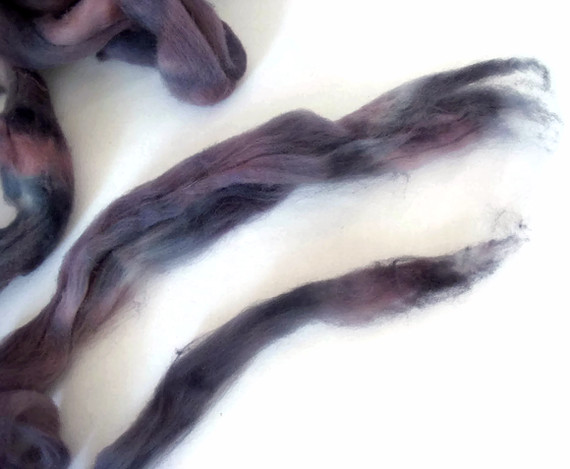

This thinner roving is aptly named pencil roving because, ideally... well, you get it.

Now, if you’re an extreme perfectionist (like me), you might find yourself getting frustrated that you can’t get each length to be exactly the same diameter. Indulge your perfectionism for no more than a few seconds; then accept that, as usual, you’re over-thinking it. It will be fine if it’s close.

This is the pencil roving I made. It’s been separated, but nothing else has been done to it yet:


Once you’ve separated the roving into four or five thinner strips that are as close to the same diameter as possible, draft them a tiny bit to even everything out.

Drafting, which simply lengthens and straightens the individual fibers so they all lay nicely together in the same direction, is easy. Hold the fiber gently with your hands a few inches apart; slowly and carefully pull your hands ever so slightly further apart and watch as the fiber straightens itself out. Be careful: If you hold your hands too far apart, or pull too hard or too fast, you will separate the roving completely. When your plan is to spin the roving, that’s no big deal; but if your plan is to knit it, you really want to avoid this!

So how do you know how far apart to put your hands and how far is too far to pull? Staple length. Yes, it’s jargon, but this, too, is a cinch to figure out. Before you start drafting the roving, pinch a tiny tuft at the end and pull it away from the rest. You’ll notice that it came off in little strands of about the same length. That’s your magic distance! We'll call it "MD." It translates in practice like this:

Place your hands farther apart than MD (so the fiber will slip easily) but don’t pull the fiber as far apart as MD or the roving will separate.

Here you see my pencil roving has been drafted:


Here you see the difference between my pencil roving in its pre-drafted state (bottom) and as drafted (top):


How much should you predraft? That’s your call. I choose to err on the side of caution and leave the fiber thicker. It’s always possible to draft a bit more as you’re knitting, if necessary -- but it’s not possible to un-separate the fiber if you pulled it apart completely.

Once you’ve drafted all your fiber, you may want to check grist. It’s not necessary since you’ll swatch for gauge anyways, but if you’re curious (or, as some of us have already confessed, a compulsive perfectionist), it’s not such a bad thing to do. You’re aiming for the pencil roving to be about the same gauge as a bulky (12 ply) yarn -- about 5 or 6 wraps per inch.


I wrap roving tighter than I normally would with yarn because the fiber is so squishy and pulls just a hair thinner as I knit with it.

While you’re drafting (or knitting), you may come across slubs. Slubs are little bits where the fiber hasn’t fully aligned. They feel like bumps in the fiber. Here's one:


Slubs are not a big issue. I take care of them like this:


I pinch them out!

Once you've pre-drafted the fiber strips, gather them together for safe-keeping. I wind them into balls like this:


If you opt to do the same, please, please, please do not make the balls center-pull! Just imagine the disaster that would cause!

That’s all there is to prepping your fiber for knitting. And, really, that is the hardest part of knitting with roving.

Stay tuned for my next guest-blog entry, when I walk through steps for prepping your pattern and knitting a simple hat with all that lovely, pre-drafted roving!

If you’re dying to try this but don’t have any roving in your stash, why not give our hand-dyed Olympic Fiber Arts roving a try?


2.09.2011

Goal!

Early last spring, just before things got crazy with my job and the move, I achieved a milestone: I spun singles that were both fine enough and consistent enough for me to ply into a viable, fingerweight sock yarn! The fact that I'm only just now writing about it should be some indication of just how fantastically life intervened.

The story:

When my Aunt Mae died late last January, I flew back to Ohio, and my sister and mom (who still lives in Ohio but had been visiting my sister) drove up from New Orleans. They picked me up at the Cleveland airport on their way into town. No sooner had we finished our hugs than we started plotting which yarn stores we could hit on the way to Mom's house. Mind you, Beth had been driving for 20 solid hours, proving two things: our compulsion for fiber borders on the masochistic and, apparently, is also genetic.

We landed at KNOTS (Knitting on the Square) in Chardon, the quaint little town where my husband grew up which is, conveniently, just a 20-minute drive south of my mom's current home. At KNOTS we chatted with the wonderful owner, Kate Jackson, and found so many great things. We were surprised to find spinning fiber at all, let alone her healthy stock of indie-dyed beauties. Kate was flabbergasted that we went straight to her shop before even getting to our destination! We picked up several kinds of fibers and colorways. More on my purchase in the future -- the subject of today's post is this lovely:

Dancing Feet Roving by TomBoy Yarns.
4oz or superwash Blue Faced Leicester.
Colorway: Jewel Tones.

They may be common colors, but they spoke to me that day... and the BFL was just so luscious.

Jump forward to April. Joseph and I had just signed a contract to purchase our new home. With the pressure to pack and move within six weeks crushing down upon me, I made what seemed then to be a logical choice: I spun the entire 4 ounces on April 5 and Navajo/chain plied it the next day. The whole time, I was thinking, "This could be socks," and behold:

380 yards. Sock yarn!

I cast on and madly knit the toes, foot, and gusset before I had to get serious about moving.

Flash forward to November. With four glorious months of parental leave stretching out before me, sanity and space returned and I found my creative energy restored. Out came the socks!


Pattern: Mash-Up Magic Toe-Up Socks (MUMTUS) by Zhenya Lavy (workshop pictorial, Ravelry page, downloadable PDF of the condensed pattern)
Primary Stitch Count: 52
Started: April 28, 2010
Completed: November 28, 2010
Materials: My Navajo-plied handspun from Superwash BFL, Jewel Tones (Dancing Feet Roving by TomBoy Yarns)
Needles: US 2 / 3.00 mm

I used a mock cable stitch with alternating twists for the leg:


This Mock Cable has a simple, four-row repeat:

1: *MT, P2, K2, P2* repeat
2 & 4: K2, P2
3: K2, P2, *MT, P2, K2, P2* repeat

(MT = Make Twist. K2tog but don't slip off needle. Insert needle back into the 1st stitch and knit. Slip both off needle.)

Blocked 

My handspun was a joy to knit. I found myself stopping to admire my work much more frequently than usual!

I have 26 grams of the handspun left -- that's about 23% of my starting quantity. I only used 77% of my fiber... about 266 yards. This confuses me. The yarn looks and feels like fingerweight, but it knit up like a higher grist. Hmmm... Thoughts?

Doesn't the color flow beautifully through the fabric? I didn't do any special spinning techniques to manipulate the color. I just let things fall where they may in the spinning and Navajo plying processes.

Before blocking. Squishy and luxurious!

They're definitely a fraternal pair, which would drive my sister crazy, but I'm good with it!  It's most obvious here:


I know it's generally preferable to block before photographing, but sometimes I feel like the blocking renders a "sterile" picture. In their pre-blocked state, they shine with all the charisma of the kinesthetic experience they have to offer!


When all was said and done, they didn't take all that much touch time to spin and knit... but they ended up being a seven-month project. Yikes!


Sadly, last week Kate announced that she's selling KNOTS to spend more time with her two little ones and prepare for the arrival of a third. Congratulations, Kate! I've really appreciated your approach and your fun voice in the newsletters. 

I'm praying someone wonderful buys the shop. As my mother-in-law says, "It's such a nice addition to Chardon Square." As I see it, a yarn store is perfect for a serene, historical setting. I'd be all over it if we still lived in Ohio!

3.20.2010

Island Knitting


My family went to Orcas Island in the San Juans the first week of January. I love the island at this time of year. We took my mother with us to the little two-room cabin on the waterfront that has become our favorite home away from home. The last night of our stay, the setting sun reflected gorgeously on the underside of the clouds. It was truly stunning.

I knit a pair of socks on the trip.


Pattern: Mash-Up Magic Toe-Up Socks (MUMTUS) - recipe compiled by me
Materials: Cherry Tree Hill's Supersock DK, Colorway: Country Garden, 1 skein
Needles: US 3 / 3.25 mm
Gauge: 6.5 st/in
Primary Stitch Count: 52


It's a straightforward sock: stockinette on foot and gusset, eye of partridge on the heel, standard 2x2 rib on the cuff. I finished them within the week of our trip.

This is the first time I've done a DK weight sock for myself. They're mushier and thicker than my usual preference. CTH promises that they wear like iron, and I'm putting it to the test given my preference for wearing boots every day. I have to say, the stretchiness of the fabric, even though I used a smaller needle size than recommended, causes me pause. Every time I put them on and slip them into my boots, I think, "Today's the day my toe will go through the end!" So far so good, though. No holes. I did reinforce the toes with my standby Russian laceweight wool, and it's only been about two months. Still, they're getting heavy wear in steady rotation...

I started another pair of socks on the island, too. This with Noro's Kureyon sock yarn. I'll blog on those later, but suffice it to say for now that I have not enjoyed one, single stitch on these socks, evidenced by the fact that they've been on the needles for two months and I've yet to get halfway through the gusset. If anyone out there has insight into the appeal this yarn holds for people, please share!

12.24.2008

When Life Throws You Snow Storms...

... knit last-minute holiday mitts!


We've been snowed in for a week (more on that later). Unfortunately, we became house-bound before doing our Christmas shopping for C. All the nieces' and nephews' presents were bought and wrapped, but we had only three little things for C when the storms descended. When it looked like we really wouldn't be able to get out at all before Christmas, I started to panic, so I whipped up these fingerless mitts. As you may recall, I'd been planning to make them for awhile. The new job had prevented me from getting all the Christmas knitting done I'd hoped, though.


Pattern: 11th-Hour Fingerless Mitts by me (size: youth)
Materials: My Handspun, 2-ply worsted (83 yds), Green Goes With Orange
Needles: US 5 / 3.75 mm
Started: December 22, 2008
Completed: December 23, 2008

I worked them both at once using Magic Loop and a mere 83 yards of fantabulously soft and springy wool you first saw me handspinning on my amazing Katherine's Cup spindle by Greensleeves. Because I wanted to show off the yarn, I kept the pattern very simple:

They're constructed from the finger(less-ness) to the cuff, with a reverse gusset for the thumbs to provide architectural interest. Knit mostly in stockinette, they do feature a 1x1 ribbed cuff and two rows of single crochet at the finger(less)s.


The crochet rows are more than a pretty detail—they're also functional. Without these rows, I could not have worked the entire body of the mitt in stockinette without having the edge roll. I really didn't want to put ribbing at the fingertips, so this was a great solution.

For the cuff, I used the Russian bind-off.


See that little bit of twist? After knitting the first two stitches and returning them to the left needle, I knit them together through the front loop rather than through the back loop to make a more braided look.

I'm so pleased with how they turned out, and words can't express what a pleasure this yarn was to knit.


And because I worked these top-down, I could use up every last scrap of the yarn making the cuff a healthy 2 inches.

Back to the reason for this last-minute present panic: Snow. Snow. Snow.

But not just ANY snow... we're talking about snow in Seattle, the city where whatever minor accumulation we might get in a year usually melts off within a day... this snow's been with us for a week, and we just keep getting more. This morning I was shocked to wake up to this:


Unimpressive for many of you, I know, but you should know that the snow on that planter (the middle blob at right) was only half that high when I went to bed last night. And look at the weight of the snow on the evergreen boughs!

Go on, you snow bunnies, laugh—I was once like you! As a young person growing up in Ohio's Snow Belt, I had no fear. Not rain nor sleet nor snow nor blizzard could keep me down! I drove in it all.

But in Seattle—where municipal snow removal consists of a handful of plow trucks (equipped not with the sharp steel blades that clear streets so nicely in Ohio but, rather, with rubber blades so as not to damage the roads), where streets are sanded rather than salted (so as not to burn plantlife or cause damage to the Puget Sound waterways), where winter temps usually hover just a degree or two above freezing, and where hills are the new flat—even a prediction of snow strikes fear in everyone's hearts!


This is straight-down snowfall, mind you. Not drifting. Check out the bench!


So we have lousy snow removal. No salt on the streets. Native Seattlites who don't have a clue how to drive in the snow. Hills. And milder climates. That's the real killer... the milder temperatures. That means the snow falls, and everything's nice and cold—and as we all know, it's not so bad driving on snow. But during the day, the temperature usually pops back up just above freezing... so we get a little thaw. And if it's not enough to thaw all the snow off, then when the temps dip below freezing again in the evening, that thaw becomes ice on top of snow. We've had that process for 7 days—with the exception of one day that never popped up above freezing because it just kept snowing.


The ice can be beautiful. But it's terrifying when it's 6 inches thick under the wheels of your tires and there's a thin layer of water between you and the ice.

Even the mail wasn't making it to our area. Think about that in the context of "we had no presents for C" and "packages from family weren't being delivered."

As it turns out, we had enough thaw late this afternoon for J to be willing to brave taking the car out. He had a harrowing trip (we live in a geological formation that is, essentially, a bowl—you have to go uphill to get out and uphill to get back in), but he did come back with some presents for C and some fixings for Christmas dinner. Not how we'd hoped the shopping would go. Still, we can't complain: C will not feel like Santa forgot her!

I promise to post the pattern for the mitts—just not tonight. I couldn't write it up with C hovering over my shoulder today, and now I need to go help J with some wrapping!

Merry Christmas to all, and to all a good night!

12.21.2008

Many Happy Returns

Oh, my—it's been two months since I posted! We can mark the beginning of my long silence to my return to full-time work, which has been quite an adjustment after a couple years' dissertation writing. (This is not to say that the dissertation is finished, just to say that it's no longer my full-time focus—which underlines the extremity of my lack of blog time.) I have continued to knit, though, plus I taught two classes and have developed another original design for one of the classes I will teach this winter.


I thought it would be nice to mark my return to blogging with a return to the Pagewood MUMTU socks I made in conjunction with the sock class I taught over three sessions in October. When last I wrote, I was thoroughly enamored with the Pagewood Farm Denali Hand Dyed Sock Yarn. Seriously enamored with it... just look at the subtle sophistication of the gorgeous Butterfly colorway!

When I returned home from the final class—where I had let two of the students practice Elizabeth Zimmerman's stretchy cast-off on my socks because they hadn't quite finished the cuffs on their own—I couldn't wait to pop them straight in the Eucalan.


If you haven't tried this soak for your woolens, I highly recommend it. I just swish a few drops into my favorite mixing bowl (which also happens to be the perfect size for soaking hand-knits), drop the socks in, let them sit for about 15 minutes, pull them out, and block/dry them. No rinsing required—it's great!


I love the way the reinforced Eye of Partridge heel looks. If you scan the above picture up to the cuffs, you can see how pretty the twisted rib looks in this yarn and how nicely it harmonizes with the heel stitch. And the yarn continues to woo me with its squishy goodness.

Some of the ladies in my class said they would not reinforce their toes or heels again because they thought it made the fabric too stiff. This was before they actually finished their socks. So I brought in several pairs with reinforced toes and heels as a demonstration: Even though it may seem like you've crafted your socks in Teflon while you're knitting, the yarns full together during washing and soften so much that you never notice the reinforcing thread when you wear them. (But they still wear like iron!)

As for this particular finished pair... and the wearing...


The socks are very pretty. As predicted, nobody else notices that they're two different colors, which I pointed out in my previous post. I'm not sure I'll knit another pair for myself in this Pagewood yarn, though. My reason has less to do with appearance than wear. These socks may actually be a little too soft. That sounds whiny and way over-privileged, so hear me out:

Remember how surprised I was that my primary stitch count was 60 for these, when I normally use 64 PSC for MUMTUs on fingering weight yarn? Well, the resulting fabric is much less dense than I prefer:you don't get the same stable feel from the fabric. And this means that while the socks are still thick and cushy feeling when I hold them in my hands, the fabric shifts and stretches so much when I put them on my feet (and into my shoes) that I worry they won't wear well over time.

Finally, they're a little thicker inside my shoes than I usually need in Seattle. If I still lived in Ohio's snow belt, they'd be much more necessary. But for Seattle's usually milder climate—I say "usually" because I've been snow-bound at home four days thanks to two storms that dumped more than 5 inches in my yard and frosted our hilly streets with a thick sheet of ice, making them completely impassable given our lack of municipal infrastructure for snow removal—for Seattle's usually milder climate, the socks aren't all that comfortable.

10.22.2008

Thoughts on Socks, Hand-Dyed Yarn, Colorways, and Better Labeling

I'm two-thirds of the way into another sock class I'm teaching at A New Yarn. We're using my MUMTU pattern to teach Magic-Loop technique, working two socks at once, toe-up, and using a gusset heel. You're already well-familiar with my pattern (download here) and in-depth pictorial workshop, so I thought I'd share my response to the sock yarn I selected this time around, as well as some thoughts about hand-dyed yarn and yarn labeling, in general.


It's Pagewood Farm's hand-dyed sock yarn in the Butterfly colorway. This is their Denali line, with a fiber content of 80/20 Superwash Merino and Nylon.

I'm particularly drawn to this yarn's lovely sensitivity to color. Pagewood Farm incorporates so many different colors and shades, but they do it in such a way that you don't end up with distinct overall striping on your project.


As with my other recent socks, I've reinforced the toes and heels not with a packaged reinforcing thread but, rather, with a 100% wool lace 2-ply in my stash—Lydia brand from a Russian mill, Moscow Wool Company. I have both a dark grey and a light grey in my stash, and I've found that one of them always looks perfect with whatever yarn I'm using on the body of the sock. In the above pictures, you can see the reinforcing on the toes and on the decorative Eye of Partridge heel stitch. Isn't it remarkable how well that grey scans so it appears to match the darker purples in the main yarn?! I highly recommend reinforcing toes, at least—it protects your hard work and is a nice way to use up left-over lace wool!

For the cuff, which is done on 60 stitches this time, I selected a twisted rib variation with a 6-stitch repeat: K3, P1, K1tbl, P1. It adds a nice architectural line to the rib, giving it a more-striking look that also works to show off the yarn.

It always makes me cringe to see hand-dyeds knit up using stitches that compete with rather than complement them. I believe one of the beauties of hand-dyed yarn is its tremendous capacity to make large areas of otherwise unchanging (a nicer word than "boring," but you know what I mean) stitching very interesting. It acts to augment. The problem is that if the stitch is too fancy—and I'm mostly talking about cables and laces here—the yarn and stitch clash. As a result, neither the yarn nor the stitch gets featured in its best light.

That's why I tend to keep my sock patterns simple when I use variegated hand-dyeds. Yes, there's room in the MUMTU pattern for lots of creativity... lots of room to substitute fancy stitches. But I pay a premium price for hand-dyed yarns, and I want to make sure the focus is on them whenever I use them.

Which brings me back to the Pagewood Farm yarn. I simply adore this colorway. It made me happy the moment I saw it, and even though I've been operating under a self-imposed moratorium from purchasing more sock yarn until I work down my stash, I made an exception for this one. The sheer number of colors used is spectacular, and I could tell at a glance the color would knit up the way I like. Plus it's very soft. (BTW: Pagewood Farm also makes a version of its sock yarn that includes some bamboo content for those looking for even mushier softness.)

I do, however, have two critiques:

First, there's quite a bit of drag on this yarn when you work with it. It's an elastic kind of drag. You can feel this strongly when winding the yarn from swift to ball, but you can also feel it when knitting. It's made me question whether there might be more distortion in these socks than in others I've made or whether I might notice a difference in terms of elasticity in the finished product.

The other critique gets back to color. I know I've just spent much of this post talking about how much I love the colorway of this yarn—and I do—but I noticed a problem. Let 's see if you can see it, too:


Did you catch it? The socks are, overall, different colors. The right sock is more pink; the left sock more purple. Now before you ask, let me assure you that this is not a dye lot problem. These socks were knit from a single skein of yarn that I divided in my own home. But there is clearly a blue-ish "dot gain" (to borrow a design/printing term) over the course of the skein.

It's disappointing. Will anyone notice it when the socks are on my feet? Probably not. But I notice. And it's the kind of thing I've noticed before in other hand-dyed yarns. Maybe I'm being overly picky or exacting. I don't know. I guess it wouldn't bother me so much if the label just gave some indication that I should expect a gradual color shift over the course of the skein—whether that means from light to dark or from one color to another.

The problem is especially troublesome when companies are marketing sock yarn in 100g put-ups. Why? Because the customers are definitely going to split those skeins and are definitely going to be disappointed when the two socks look completely different (and not always in the most optimal way).

I think sock-yarn labeling, in general, needs an overhaul. If the label doesn't have a picture of a knit-up sample and the LYS doesn't have a swatch knit up, it's not always possible to tell whether there's a distinct color repeat in the yarn or not. If yarn companies provided us with a simple statement indicating that the yarn either did or didn't have a distinct color repeat, it would save a good deal of time for those of us who actually do like to knit matching pairs, when possible. And if there is, in fact, a distinct repeat (created through a space-dyeing technique, right?) why not do like the wallpaper companies and tell us the length of repeat. You know what I mean? It could be as simple as this:

Colorway: Apple Pie, 24-inch repeat -OR-
Colorway: Crazy Neighbor, 16-foot repeat -OR, as in the yarn I'm using now-
Colorway: Butterfly, all-over variegation

... or some such.

Wouldn't that be nice?

I get that hand-dyed yarns shouldn't be held to the same consistency standards as machine-dyed. I love them for it. And I love all the techniques for striping and dyeing we see today. Bring it on! Just give me a label that provides a slightly better sense of what I'm getting. Nothing worse than loving the way a yarn looks skeined up but hating the way it works up because you didn't have just that little bit of extra information (which you know the manufacturer/dyer already has) that could give you a better chance of making an appropriate project choice for it.

8.06.2008

Old Dog . . .

. . . New Trick!


Did you catch that, observant and loyal blog readers? It may be subtle, so I'll bring it close up:


I was going to turn this into a guessing game and have you place your guesses in the comments then reveal the answer tomorrow with some fabulous prize, but I've never been much for suspense. Besides, I wouldn't be able to talk about the WIP if I did that because the name would give it away.

The pattern is Maizy Lace by Cathy Hannigan. The yarn is called Maizy—and it's 82% corn fiber, 18% elastic nylon—in the Neptune colorway. My first time working with the stuff. So far so good. . . It's different, but not in a bad way. I opted for Magic Loop technique but am sticking with top-down construction, as written.

I'm calling this project my Continental Maizy Lace Socks. (hint hint hint)


Surely you've guessed it by now?!

I'm knitting Continental instead of Western. I'm picking instead of throwing.

Every stitch.

Just because.

It's no small thing re-training my hands after 30 years of knitting!

8.04.2008

Downward Spiral—A Cinderella Story?

It had to happen sooner or later: A project that just doesn't work for me. I've hinted around about my despair over this project. I couldn't face blogging about it sooner. But it's time to work through the pain and get it over with.


This cleverly staged photograph masks the utter failure of the downward spiral that was (and is) my Redhawk Tailspin of Pacific Beach Socks, knit from Cat Bordhi's Spiraling Coriolis architecture in New Pathways. Originally intended for me, the socks are being modeled by J because of how ridiculous they look on my feet.

Pattern: Spiraling Master Coriolis by Cat Bordhi
Materials: Mountain Colors Bearfoot, 1 skein (350 yds with quite a bit left), Red Hawk Tail.
Needles: US 2 / 2.75 mm
Started: June 21, 2008
Completed: July 31, 2008
Technique: 2 at once on Magic Loop

I swatched. I checked gauge. I checked and re-checked my measurements and my calculations. If I were to try knitting these again tomorrow, I'd end up working with the same master numbers and would end up with the same bloody mess.

As far as I can tell, the problem likely has to do with my instep: Mine is unusually tall. So using the numbers the architecture specifies for my instep height meant creating a horribly baggy mid-foot and arch. It's an odd experience for me to have any socks too baggy in the arch because my feet are almost completely flat.

These socks fit through the toe and the ball of the foot, and they fit through the "bottom of heel to top of instep" measurement, but they're swimming everywhere else. I did try them on as I knit, and I knew they were awfully baggy . . . but I held true to my faith in the made-to-fit qualities of Bordhi's pattern and convinced myself that something else—surely—would happen in the architectural construction to pull the bagginess around and make them work. Boy was I wrong.

I mean, seriously. Check out the carnage as they blob all over my 9" antique sock blockers:

My first UGH in 30 years of knitting!

(If you look at the top picture again, you can see signs of puckering in the arch area along the left side of the picture, and you can see how straight the right side—which corresponds to the bottom of the foot—looks.)

By the time the sad truth about these socks could no longer be denied, I figured I would felt them to adjust fit. I decided not to frog and re-knit the socks because I simply didn't care enough for the pattern.

I know, I know: Other people love this pattern. More power to them! But besides my issues with the finished results I got, I have a lot of problems with the way the pattern is written, in general. I'm a well-practiced reader of all kinds of patterns and charts. I can't remember the last time I had such issues with the way a pattern was written. Flame me if you want, but I found Bordhi's style tedious and overly complicating of something that need not be so thick.

To be honest, even if the socks fit me better, I don't know how much I'd actually wear them beyond around the house stuff . . . which is what may happen to them anyways if I don't find another foot that fits them.

As for my efforts to felt them? Silly me. I normally knit with non machine-washable wools, but I knit this particular pair with a superwash . . . a fact I remembered only after tossing them in the wash and having them come out exactly the same as before they went in. The good news: Mountain Colors Bearfoot is a fantastic superwash! The bad news: I really would have preferred the option of felting.

Ah well. I'm sure someone with bigger feet will like them. They're customized to fit someone . . . but how will I find the foot? Anyone in contact with Cinderella's prince—or his footman?!

8.03.2008

Looking Forward to Fall

Last week I finalized my fall teaching schedule at A New Yarn. I'm offering two classes: Magic Loop Socks and Cables & Twists (details below). Also, the shop will be featuring my MUMTU Socks and Tweedy Cabled Cap patterns as give-aways at Seattle's 4th Annual Stitch & Pitch on Thursday! (You know that the nationwide Stitch & Pitch phenomenon actually got its start here in Seattle in 2005, don't you? Even though it was driven by retail stores, it's yet another reason why Seattle rocks!)

I stopped by A New Yarn yesterday to get this:


Five skeins (one's buried) of yummy Queensland Kathmandu DK in deep purple with flecks of white, blue, pink, and red. I will be knitting up a shop sample of the Tweedy Cabled Cap with one of these skeins. The others are for a scarf I'm designing to match.

Claudia, Program Manager of A New Yarn, will be posting the new class schedule next week. For now, here are the basics:

Magic Loop Socks
October 11, 18, and 25
10am - Noon
Learn to knit two socks at once from the toe up with this clever method. Course includes a lesson in Judy's Magic Cast-On. Join us as we make the Mash-Up Magic Toe-Up (MUMTU) Socks, which will give you a customized fit with whatever yarn weight or needle size you choose.

Cables & Twists
November 8 and 15
10am - Noon
If you love the look of cables and twists but haven't tried them before, now is your chance. Join us as we knit the Tweedy Cabled Cap to learn the basic techniques of making and moving cables and twisted stitches. We will learn methods of crossing stitches both with and without a cable needle.